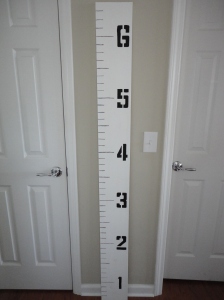
I moved around a lot as a kid, and so we didn't have our heights marked on a doorframe. Even though Hot Stuff and I don't have any intention of moving any time soon, I still hesitate to do something so important on something I can't take with me.
I troll the crafty/DIY blogs like it is my job, so I have run into several versions of the "giant ruler" height chart, and I love it. When I decided to start exploring my own craft/DIY side, this was one of the first projects I started. Started is the key word. I think Hot Stuff gets irritated with me because I have approximately 804 projects that I have started and not finished. It started out really well. I got a 5 ft piece of wood from my neighborhood hardware store, painted the whole thing white, and then marked out the length, using different length lines to imitate the way a ruler works. Then I stalled. I tried several ways to get the numbers on - freehand (yeah right) and printing out numbers on paper then tracing. It just wasn't working.
Now, if I had the Cricut or Silhouette I could have cut the numbers out on vinyl and bada bing it would be done. Alas, I do not have a vinyl cutter so I had to find another way. I did, however, make sure Hot Stuff knew it was on my wish list :)
Fast forward about 6 months. The board has been sitting in the dining room collecting dust. I have once again claimed my crown as the Queen of Procrastination. Another trip to the hardware store, but this time I bought 4" letter stencils. Within two hours of getting home, I had done it! A finished product! I am so pleased with the results! Now, to gather the little men's measurements so I can add them in after the fact...:)

**Update** You may notice that in the picture above, the height chart is just leaning against the wall. This is not what I would recommend, since I started the chart at 6", so everyone would be a half a foot taller than in real life. Or maybe that's your family's goal - if so, knock yourself out! ;) But Hot Stuff helped me by drilling eye hooks in the top, and then I braided some yarn (for added strength) and we strung that baby up!
It took a few minutes of finagling to get it at the right height (complicated by the Tiny Men begging to use the drill and tape measure - they are so Daddy's boys) but we are totally excited about how it looks! We actually found out that Tiny Man #1 had grown about an inch in the last 6 months! I knew something was different about him...
And here's the final product!


No comments:
Post a Comment